Below you can see what information is sent depending on the type of event: import : import_id (can be read via API ), status newsletter_status: newsletter _ id , status unsub : newsletter_id , subject , list_id , subscriber_id , email spam : newsletter_id , subject , list_id , subscriber_id , email bounce : newsletter_id , subject , list_id, subscriber_id , email , email_head (the entire bounce message), diag_msg (short description of the bounce), hard_bounce (if the bounce is hardbounce)
Discount coupons can be either import-based (codes are manually uploaded) or API-based (codes are generated on-demand).
To generate discount coupons from your website via API, your website needs to provide a webhook URL that:
Receives multiple GET parameters;
Generates unique (single-use) codes on your website based on the provided parameters.
The mandatory GET parameters that can be specified are:
type – INT – The type of discount generated by the coupon, which can be 0 (fixed value), 1 (percentage), or 2 (free shipping).
value – INT | FLOAT – Appears for percentage or fixed value types. If type is 1 (percentage), it contains the discount percentage; otherwise, it contains the fixed value.
Optionally, the following parameters can also be specified:
batch_size – INT – The number of codes that should be generated by the webhook URL (optional but recommended). Codes can be generated in batches to reduce the number of requests. A single code can still be returned even if this parameter is specified.
prefix – STRING – The prefix that should be added at the beginning of the codes.
expire_date – STRING – The expiration date in the format YYYY-MM-DD HH:MM for the codes.
min_amount – FLOAT – The minimum cart value required to apply the coupon (if specified, it should be based on the amount without VAT).
currency – STRING – Can be RON or EUR (used when specifying a fixed discount value or minimum order amount).
The returned response can be a string (containing the generated code if a single code was created) or an array (list of codes) in JSON format, containing the following keys:
status – 0 (for error) or 1 (for success).
codes – An array containing the generated codes (in case of success).
A. To test an automation or an email flow already created, in addition to the steps here, we recommend following these steps:
Check the feed in the account.
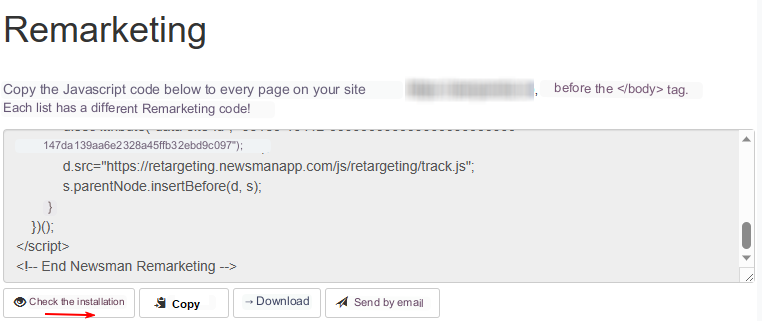
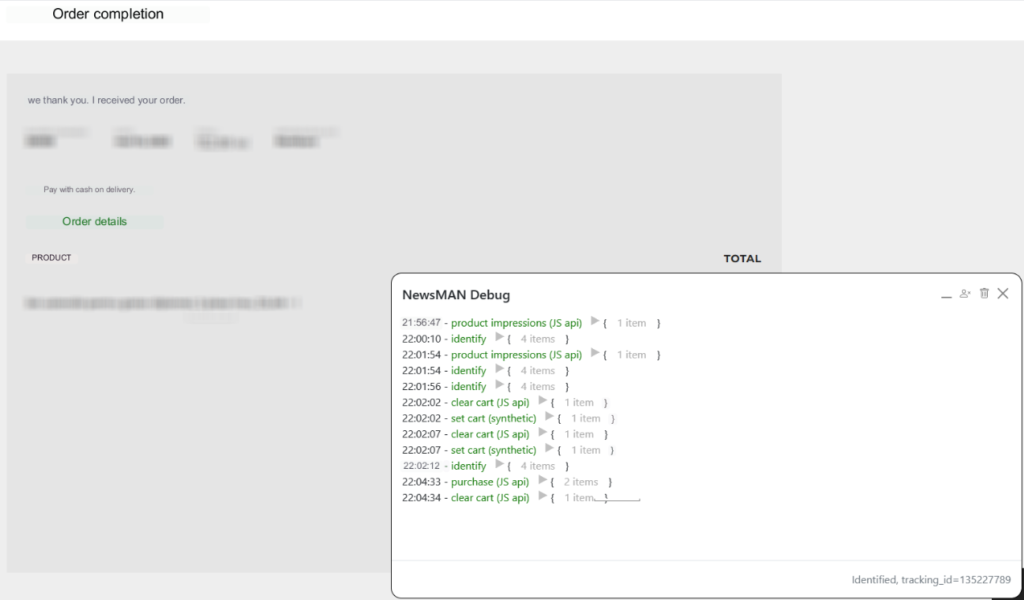
Go to Settings > Remarketing, click on the Verify installation button
This message appears “It is installed and working correctly” and the NewsMAN Debug tool.
Open ‘NewsMAN Debug’ – create an account within this tool, view some products on the website, then add them to the basket, place and complete the order/test orders. If the types of events appear: product impressions, set cart, purchase – the flow has been completed successfully.
In addition, addresses are no longer identified from the form/checkout/purchase page (customers) if the respective addresses are also subscribers.
Customers are not always subscribed or vice versa.
Customers have visitor status in the platform, they are not sent newsletters, but automations.
If a customer subscribes through the subscription check box on the checkout page or subscription form, he becomes a subscriber.
Check if the product id in the feed is the same as the product id in the cart/checkout/purchase page:
if the product id in the feed is not the same as the product id in the cart/checkout/purchase page, you have a bounce, you don’t have a feed set in your account or these errors appear when there are products in the basket/orders that do not exist in the feeds:
Segmentation helps you send personalized emails and campaigns to your subscribers. For example, instead of emailing the entire list, you can email only to men or women (video 2 below), to those active in the last x months (video 3 below), to those in a certain city/county (video 4 below), to those who subscribed in the last month, etc.
Below is the complete list of criteria by which the subscriber list can be segmented:
Fixed subscriber properties Custom variables: a) Subscriber ID a) name, surname, date of birth, gender, age, etc. b) Email b) Subscription date c) Domain c) Subscription method d) Location by IP e) After newsletter click rate/total percentage e) Country by IP d) After open rate percentage/total f) Region by IP f) He clicked on the X link g) Name g) Is / is not in the segments h) First name h) Received / did not receive the X newsletter i) Stars 1-5 i) He opened / did not open the X newsletter e) Last activity j) Remarketing j) Last click k) Browser l) Devices m) Operating system
To create a segment in the list, go to Segments > Create Segment > name the segment (Segment Name) > choose one or more rules from Segment Rules > click Add to add the condition > click Save. After clicking Save, the subscriber upload operation will run. When the segment has loaded, the cog showing that the process is in progress will disappear.
The video tutorials below will help you segment your list:
1) Create simple segment or create segment without rules:
https://vimeo.com/836616914
2) Creating a segment by a custom variable (segmentation by gender)
SMTP is a means of transport for transactional e-mails (emails from the account confirmation site, password reset, transaction info) and has the role of helping to capture the status of orders (in progress/new order/completed/delivered order) . If you want to send emails from your application, purchase SMTP credits and use the credentials in the transactional section.
Here are the steps for setting up your transactional account:
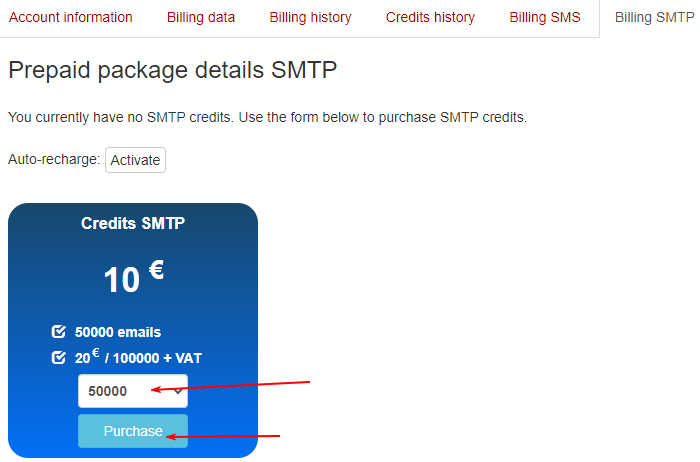
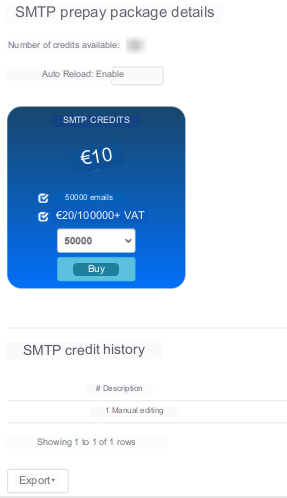
A. Purchase SMTP credits
From My Account (the little guy on the top right) > Billing History, go to SMTP Billing:
click on 50000 and choose the number of credits you want
press Buy
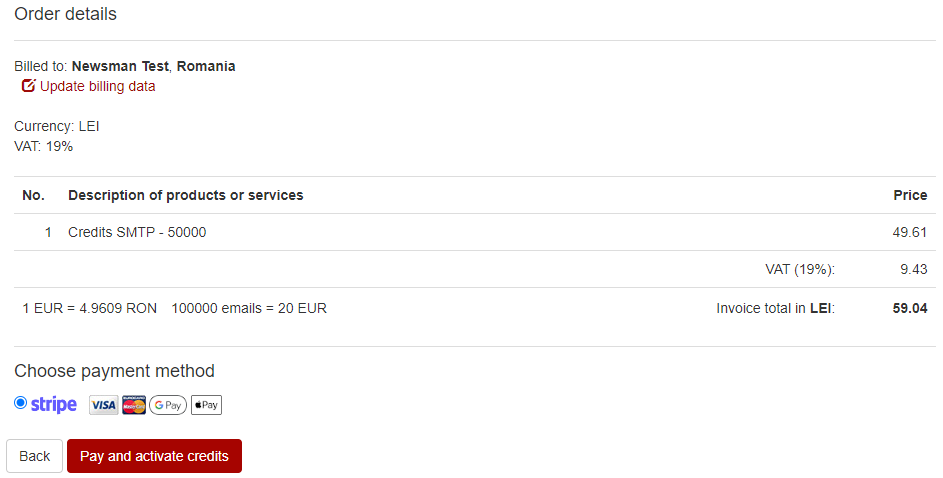
After clicking on Buy, the details of the transactional credit order will be displayed. Then choose the payment method and press Pay and activate credits:
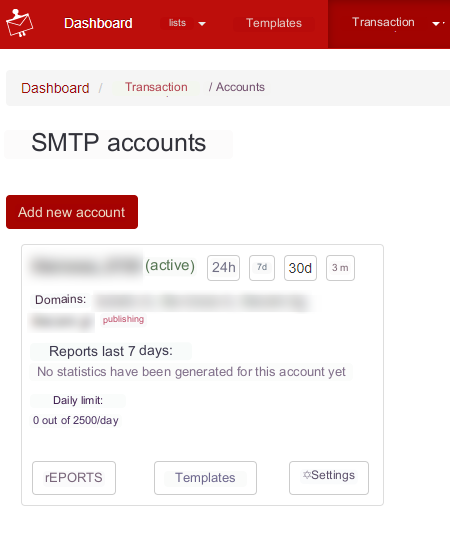
B. Add the SMTP account
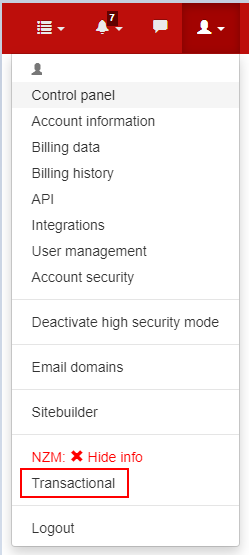
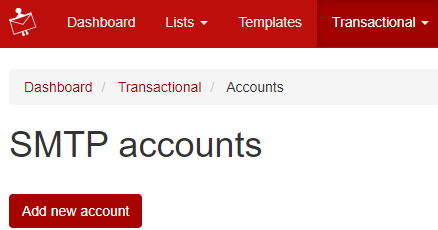
Go to My Account (little man on the top right) > Transactional:
The SMTP Accounts page will open where you will click on Add new account:
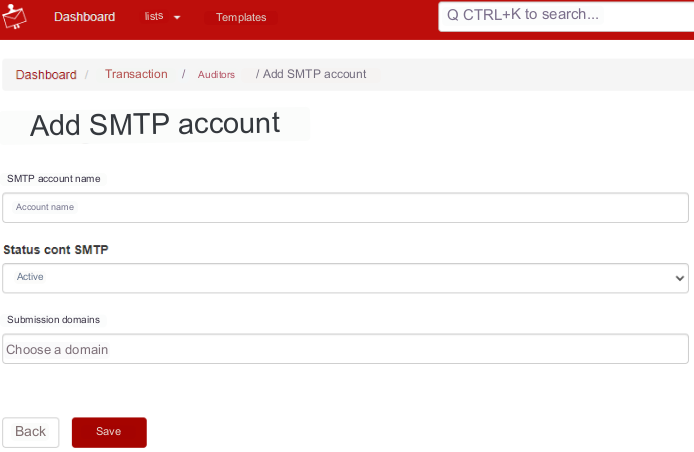
Complete the details from Transactional> Accounts> View SMTP account in your application, to the external mail or SMTP option and save:
at Account name write a name related to the site for which you are setting SMTP
keep SMTP Account Status active
at Send domains click on Choose a domain and select the already validated domain of the desired site. If you haven’t validated your domain yet, you can follow the validation steps.
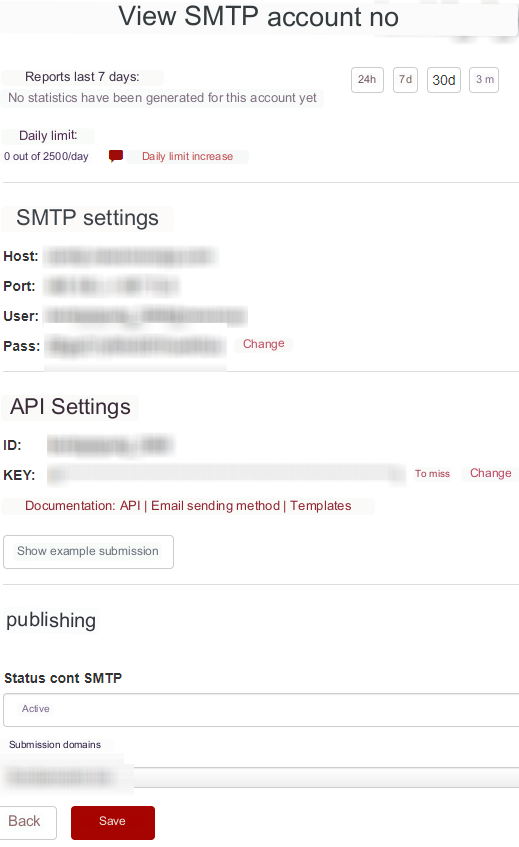
After saving, you will see the details of the transactional account from SMTP credit history and My account > Transactional:
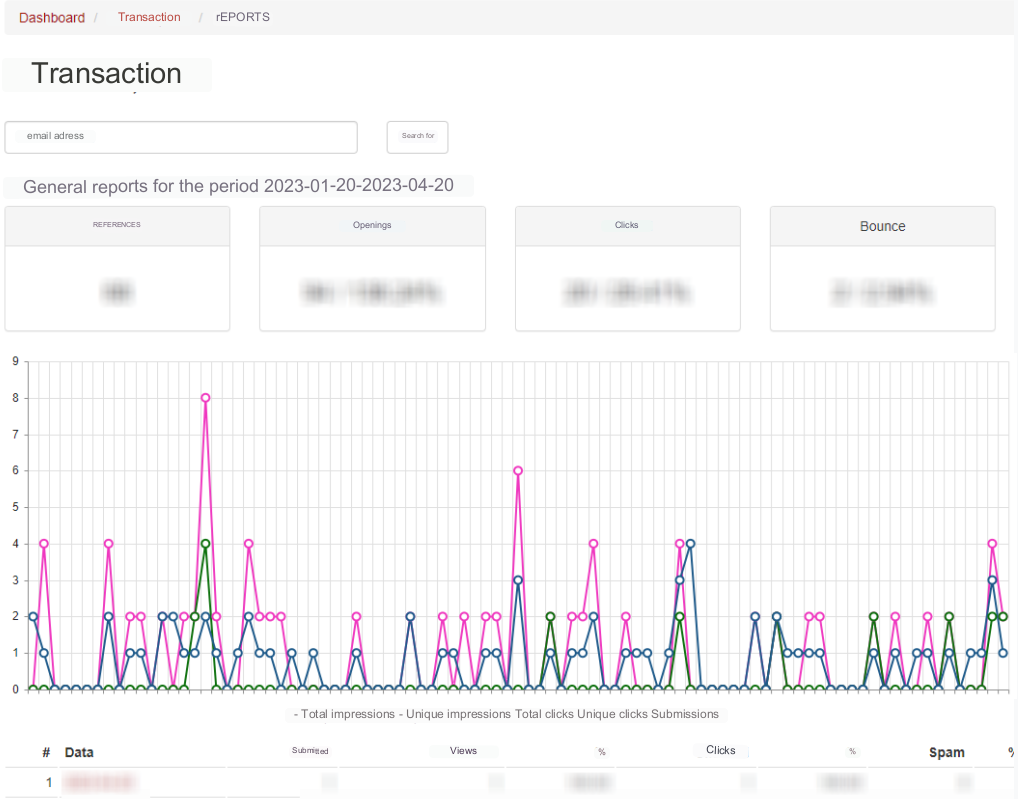
You can check the reports, after submissions, from Transactional > Reports:
Newsman since we ever launched, we had this feature ON, but in a form somehow rudimentary. At first only supports email in to list, after we added to list and segment Email IN and now everything is customizable.
Email IN what? Well, it’s really simple. Email IN is an email address to which you can send messages (e-mails) and is intended to capture and redistribute messages on the whole list or the list by a sub set (segment).
In translation, to send a newsletter, you can use ANY editor mail with which you are already accustomed, including Outlook or Gmail or Thuderbird. They are supported including inline pictures and attachments.
New Email IN allow extra reference to several segments and eliminating the need for confirmation of the newsletter (at Newsman all newsletters are moderate).
Set Email IN – Newsman Newsletter
If your site is already a script that generates HTML content for newsletter, you can do integration with Newsman very quickly. Instead of sending the same message to all local list, import the list into Newsman and sent to one address (the Email IN). Don’t worry, we have filters that are automatically set to plain text (diacritical safe) or automatically add social sharing newsletter header and footer with links to unsubscribe (best practices requirement).
For the oldest of us, who caught the glory years of Linux, this feature is inspired by Ezmlm IDX (mailing list manager for Qmail).